Examples: Segmentation Maps and Masks
imgaug offers support for segmentation map data, such as semantic
segmentation maps, instance segmentation maps or ordinary masks. Segmentation
maps can be augmented correspondingly to images. E.g. if an image is rotated
by 45°, the corresponding segmentation map for that image will also be rotated
by 45°.
Note: All augmentation functions for segmentation maps are implemented under the assumption of augmenting ground truth data. As such, segmentation maps will be affected by augmentations that change the geometry of images (e.g. affine transformations, cropping, resizing), but not by other augmentations (e.g. gaussian noise, saturation changes, grayscaling, dropout, …).
Features of the library’s segmentation map support:
- Represent segmentation maps as objects (
imgaug.augmentables.segmaps.SegmentationMapsOnImage).- Support integer maps (integer dtypes, usually
int32) and boolean masks (dtypenumpy.bool_).- Augment segmentation maps (only geometry-affecting augmentations, e.g. affine transformations, cropping, …).
- Use different resolutions for segmentation maps and images (e.g.
32x32segmentation maps and256x256for the corresponding images).- Draw segmentation maps – on their own or on images (
SegmentationMapsOnImage.draw(),SegmentationMapsOnImage.draw_on_image()).- Resize segmentation maps (
SegmentationMapsOnImage.resize()).- Pad segmentation maps by pixel amounts or to desired aspect ratios (
SegmentationMapsOnImage.pad(),SegmentationMapsOnImage.pad_to_aspect_ratio()).
Notebook
A jupyter notebook for segmentation map augmentation is available at Jupyter Notebooks. The notebooks are usually more up to date and contain more examples than the ReadTheDocs documentation.
A simple example
The following example loads a standard image and defines a corresponding
int32 segmentation map. The image and segmentation map are augmented in the
same way and the results are visualized.
import imageio
import numpy as np
import imgaug as ia
import imgaug.augmenters as iaa
from imgaug.augmentables.segmaps import SegmentationMapsOnImage

ia.seed(1)

# Load an example image (uint8, 128x128x3).
image = ia.quokka(size=(128, 128), extract="square")

# Define an example segmentation map (int32, 128x128).
# Here, we arbitrarily place some squares on the image.
# Class 0 is our intended background class.
segmap = np.zeros((128, 128, 1), dtype=np.int32)
segmap[28:71, 35:85, 0] = 1
segmap[10:25, 30:45, 0] = 2
segmap[10:25, 70:85, 0] = 3
segmap[10:110, 5:10, 0] = 4
segmap[118:123, 10:110, 0] = 5
segmap = SegmentationMapsOnImage(segmap, shape=image.shape)

# Define our augmentation pipeline.
seq = iaa.Sequential([
    iaa.Dropout([0.05, 0.2]),      # drop 5% or 20% of all pixels
    iaa.Sharpen((0.0, 1.0)),       # sharpen the image
    iaa.Affine(rotate=(-45, 45)),  # rotate by -45 to 45 degrees (affects segmaps)
    iaa.ElasticTransformation(alpha=50, sigma=5)  # apply water effect (affects segmaps)
], random_order=True)

# Augment images and segmaps.
images_aug = []
segmaps_aug = []
for _ in range(5):
    images_aug_i, segmaps_aug_i = seq(image=image, segmentation_maps=segmap)
    images_aug.append(images_aug_i)
    segmaps_aug.append(segmaps_aug_i)

# We want to generate an image containing the original input image and
# segmentation maps before/after augmentation. (Both multiple times for
# multiple augmentations.)
#
# The whole image is supposed to have five columns:
# (1) original image,
# (2) original image with segmap,
# (3) augmented image,
# (4) augmented segmap on augmented image,
# (5) augmented segmap on its own in.
#
# We now generate the cells of these columns.
#
# Note that draw_on_image() and draw() both return lists of drawn
# images. Assuming that the segmentation map array has shape (H,W,C),
# the list contains C items.
cells = []
for image_aug, segmap_aug in zip(images_aug, segmaps_aug):
    cells.append(image)                                         # column 1
    cells.append(segmap.draw_on_image(image)[0])                # column 2
    cells.append(image_aug)                                     # column 3
    cells.append(segmap_aug.draw_on_image(image_aug)[0])        # column 4
    cells.append(segmap_aug.draw(size=image_aug.shape[:2])[0])  # column 5

# Convert cells to a grid image and save.
grid_image = ia.draw_grid(cells, cols=5)
imageio.imwrite("example_segmaps.jpg", grid_image)
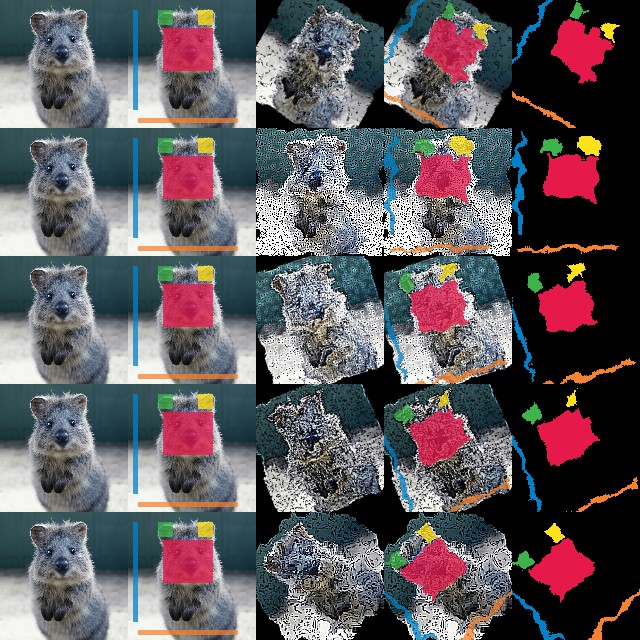
Results of the above example code. Columns show: (1) Original image, (2) original segmentation map drawn on original image, (3) augmented image, (4) augmented segmentation map drawn on augmented image, (5) augmented segmentation map drawn on its own.
Using boolean masks
In order to augment masks, you can simply use boolean arrays. Everything else
is identical to int32 maps. The below code shows an example and is very
similar to the previous code for int32 maps. It noteably changes
np.zeros((128, 128, 1), dtype=np.int32) to
np.zeros((128, 128, 1), dtype=bool).
import imageio
import numpy as np
import imgaug as ia
from imgaug.augmentables.segmaps import SegmentationMapsOnImage

# Load an example image (uint8, 128x128x3).
image = ia.quokka(size=(128, 128), extract="square")

# Create an example mask (bool, 128x128).
# Here, we arbitrarily place a square on the image.
segmap = np.zeros((128, 128, 1), dtype=bool)
segmap[28:71, 35:85, 0] = True
segmap = SegmentationMapsOnImage(segmap, shape=image.shape)

# Draw three columns: (1) original image,
# (2) original image with mask on top, (3) only mask
cells = [
    image,
    segmap.draw_on_image(image)[0],
    segmap.draw(size=image.shape[:2])[0]
]

# Convert cells to a grid image and save.
grid_image = ia.draw_grid(cells, cols=3)
imageio.imwrite("example_segmaps_bool.jpg", grid_image)
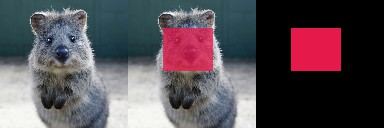
Results of the above example code. Columns show: (1) Original image, (2) boolean segmentation map (i.e. mask) drawn on image, (3) boolean segmentation map drawn on its own.
Accessing the segmentation map array
After augmentation it is often desired to re-access the segmentation map
array. This can be done using SegmentationMapsOnImage.get_arr(),
which returns a segmentation map array with the same shape and dtype as
was originally provided as arr to SegmentationMapsOnImage(arr, ...).
The below code shows an example that accesses and changes the array.
import imageio
import numpy as np
import imgaug as ia
from imgaug.augmentables.segmaps import SegmentationMapsOnImage

# Load an example image (uint8, 128x128x3).
image = ia.quokka(size=(128, 128), extract="square")

# Create an example segmentation map (int32, 128x128).
# Here, we arbitrarily place some squares on the image.
# Class 0 is the background class.
segmap = np.zeros((128, 128, 1), dtype=np.int32)
segmap[28:71, 35:85, 0] = 1
segmap[10:25, 30:45, 0] = 2
segmap[10:25, 70:85, 0] = 3
segmap[10:110, 5:10, 0] = 4
segmap[118:123, 10:110, 0] = 5
segmap1 = SegmentationMapsOnImage(segmap, shape=image.shape)

# Read out the segmentation map's array, change it and create a new
# segmentation map
arr = segmap1.get_arr()
arr[10:110, 5:10, 0] = 5
segmap2 = ia.SegmentationMapsOnImage(arr, shape=image.shape)

# Draw three columns: (1) original image, (2) original image with
# unaltered segmentation map on top, (3) original image with altered
# segmentation map on top
cells = [
    image,
    segmap1.draw_on_image(image)[0],
    segmap2.draw_on_image(image)[0]
]

# Convert cells to grid image and save.
grid_image = ia.draw_grid(cells, cols=3)
imageio.imwrite("example_segmaps_array.jpg", grid_image)
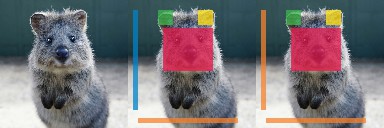
Results of the above example code. Columns show: (1) Original image, (2) original segmentation map drawn on original image, (3) segmentation map with modified array drawn on image.
Resizing and padding
Segmentation maps can easily be resized and padded. The methods are identical
to the ones used for heatmaps (see :doc:examples_heatmaps), though
segmentation maps do not offer resizing via average or max pooling. The
resize() method also defaults to nearest neighbour interpolation (instead
of cubic interpolation) and it is recommended to not change that.
The functions for resizing and padding are:
SegmentationMapsOnImage.resize(sizes, interpolation="nearest"): Resizes tosizesgiven as a tuple(height, width). Interpolation can benearest,linear,cubicandarea, but onlynearestis actually recommended.SegmentationMapsOnImage.pad(top=0, right=0, bottom=0, left=0, mode="constant", cval=0): Pads the segmentation map by given pixel amounts. Uses by default constant value padding with value0, i.e. zero-padding. Possible padding modes are the same as fornumpy.pad(), i.e.constant,edge,linear_ramp,maximum,mean,median,minimum,reflect,symmetricandwrap.SegmentationMapsOnImage.pad_to_aspect_ratio(aspect_ratio, mode="constant", cval=0,return_pad_amounts=False): Same aspad(), but pads an image towards a desired aspect ratio (ratio = width / height). E.g. use1.0for squared segmentation maps or2.0for maps that are twice as wide as they are high.