Examples: Bounding Boxes
imgaug offers support for bounding boxes (aka rectangles, regions of interest). E.g. if an image is rotated during augmentation, the library can also rotate all bounding boxes on it correspondingly.
Features of the library’s bounding box support:
- Represent bounding boxes as objects (imgaug.augmentables.bbs.BoundingBox).
- Augment bounding boxes.
- Draw bounding boxes on images.
- Move/shift bounding boxes on images, project them onto other images (e.g. onto the same image after resizing), compute their intersections/unions and IoU values.
Notebook
A jupyter notebook for bounding box augmentation is available at Jupyter Notebooks. The notebooks are usually more up to date and contain more examples than the ReadTheDocs documentation.
A simple example
The following example loads an image and places two bounding boxes on it. The image is then augmented to be brighter, slightly rotated and scaled. These augmentations are also applied to the bounding boxes. The image is then shown before and after augmentation (with bounding boxes drawn on it).
import imgaug as ia
import imgaug.augmenters as iaa
from imgaug.augmentables.bbs import BoundingBox, BoundingBoxesOnImage


ia.seed(1)

image = ia.quokka(size=(256, 256))
bbs = BoundingBoxesOnImage([
    BoundingBox(x1=65, y1=100, x2=200, y2=150),
    BoundingBox(x1=150, y1=80, x2=200, y2=130)
], shape=image.shape)

seq = iaa.Sequential([
    iaa.Multiply((1.2, 1.5)), # change brightness, doesn't affect BBs
    iaa.Affine(
        translate_px={"x": 40, "y": 60},
        scale=(0.5, 0.7)
    ) # translate by 40/60px on x/y axis, and scale to 50-70%, affects BBs
])

# Augment BBs and images.
image_aug, bbs_aug = seq(image=image, bounding_boxes=bbs)

# print coordinates before/after augmentation (see below)
# use .x1_int, .y_int, ... to get integer coordinates
for i in range(len(bbs.bounding_boxes)):
    before = bbs.bounding_boxes[i]
    after = bbs_aug.bounding_boxes[i]
    print("BB %d: (%.4f, %.4f, %.4f, %.4f) -> (%.4f, %.4f, %.4f, %.4f)" % (
        i,
        before.x1, before.y1, before.x2, before.y2,
        after.x1, after.y1, after.x2, after.y2)
    )

# image with BBs before/after augmentation (shown below)
image_before = bbs.draw_on_image(image, size=2)
image_after = bbs_aug.draw_on_image(image_aug, size=2, color=[0, 0, 255])
Console output of the example:
BB 0: (65.0000, 100.0000, 200.0000, 150.0000) -> (130.7524, 171.3311, 210.1272, 200.7291)
BB 1: (150.0000, 80.0000, 200.0000, 130.0000) -> (180.7291, 159.5718, 210.1272, 188.9699)
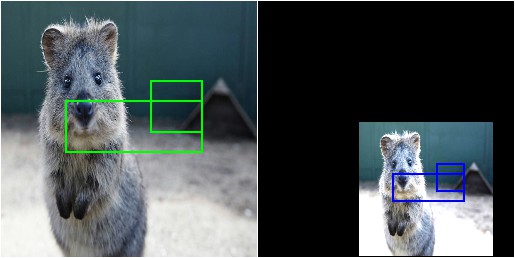
Image with bounding boxes, before (left) and after (right) augmentation. Bounding boxes are shown in green (before augmentation) and blue (after augmentation).
Note that the bounding box augmentation works by augmenting each box’s edge coordinates and then drawing a bounding box around these augmented coordinates. Each of these new bounding boxes is therefore axis-aligned. This can sometimes lead to oversized new bounding boxes, especially in the case of rotation. The following image shows the result of the same code as in the example above, but Affine was replaced by Affine(rotate=45):
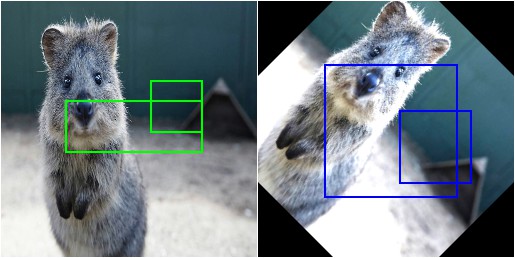
Image with bounding boxes, before (left) and after (right) augmentation. The image was augmentated by rotating it by 45 degrees. The axis-aligned bounding box around the augmented keypoints ends up being oversized.
Dealing with bounding boxes outside of the image
When augmenting images and their respective bounding boxes, the boxes can end up fully or partially outside of the image plane. By default, the library still returns these boxes, even though that may not be desired. The following example shows how to (a) remove bounding boxes that are fully/partially outside of the image and (b) how to clip bounding boxes that are partially outside of the image so that their are fully inside.
import numpy as np
import imgaug as ia
import imgaug.augmenters as iaa
from imgaug.augmentables.bbs import BoundingBox, BoundingBoxesOnImage


ia.seed(1)

GREEN = [0, 255, 0]
ORANGE = [255, 140, 0]
RED = [255, 0, 0]

# Pad image with a 1px white and (BY-1)px black border
def pad(image, by):
    image_border1 = ia.pad(image, top=1, right=1, bottom=1, left=1,
                           mode="constant", cval=255)
    image_border2 = ia.pad(image_border1, top=by-1, right=by-1,
                           bottom=by-1, left=by-1,
                           mode="constant", cval=0)
    return image_border2

# Draw BBs on an image
# and before doing that, extend the image plane by BORDER pixels.
# Mark BBs inside the image plane with green color, those partially inside
# with orange and those fully outside with red.
def draw_bbs(image, bbs, border):
    image_border = pad(image, border)
    for bb in bbs.bounding_boxes:
        if bb.is_fully_within_image(image.shape):
            color = GREEN
        elif bb.is_partly_within_image(image.shape):
            color = ORANGE
        else:
            color = RED
        image_border = bb.shift(left=border, top=border)\
                         .draw_on_image(image_border, size=2, color=color)

    return image_border

# Define example image with three small square BBs next to each other.
# Augment these BBs by shifting them to the right.
image = ia.quokka(size=(256, 256))
bbs = BoundingBoxesOnImage([
    BoundingBox(x1=25, x2=75, y1=25, y2=75),
    BoundingBox(x1=100, x2=150, y1=25, y2=75),
    BoundingBox(x1=175, x2=225, y1=25, y2=75)
], shape=image.shape)

seq = iaa.Affine(translate_px={"x": 120})
image_aug, bbs_aug = seq(image=image, bounding_boxes=bbs)

# Draw the BBs (a) in their original form, (b) after augmentation,
# (c) after augmentation and removing those fully outside the image,
# (d) after augmentation and removing those fully outside the image and
# clipping those partially inside the image so that they are fully inside.
image_before = draw_bbs(image, bbs, 100)
image_after1 = draw_bbs(image_aug, bbs_aug, 100)
image_after2 = draw_bbs(image_aug, bbs_aug.remove_out_of_image(), 100)
image_after3 = draw_bbs(image_aug, bbs_aug.remove_out_of_image().clip_out_of_image(), 100)
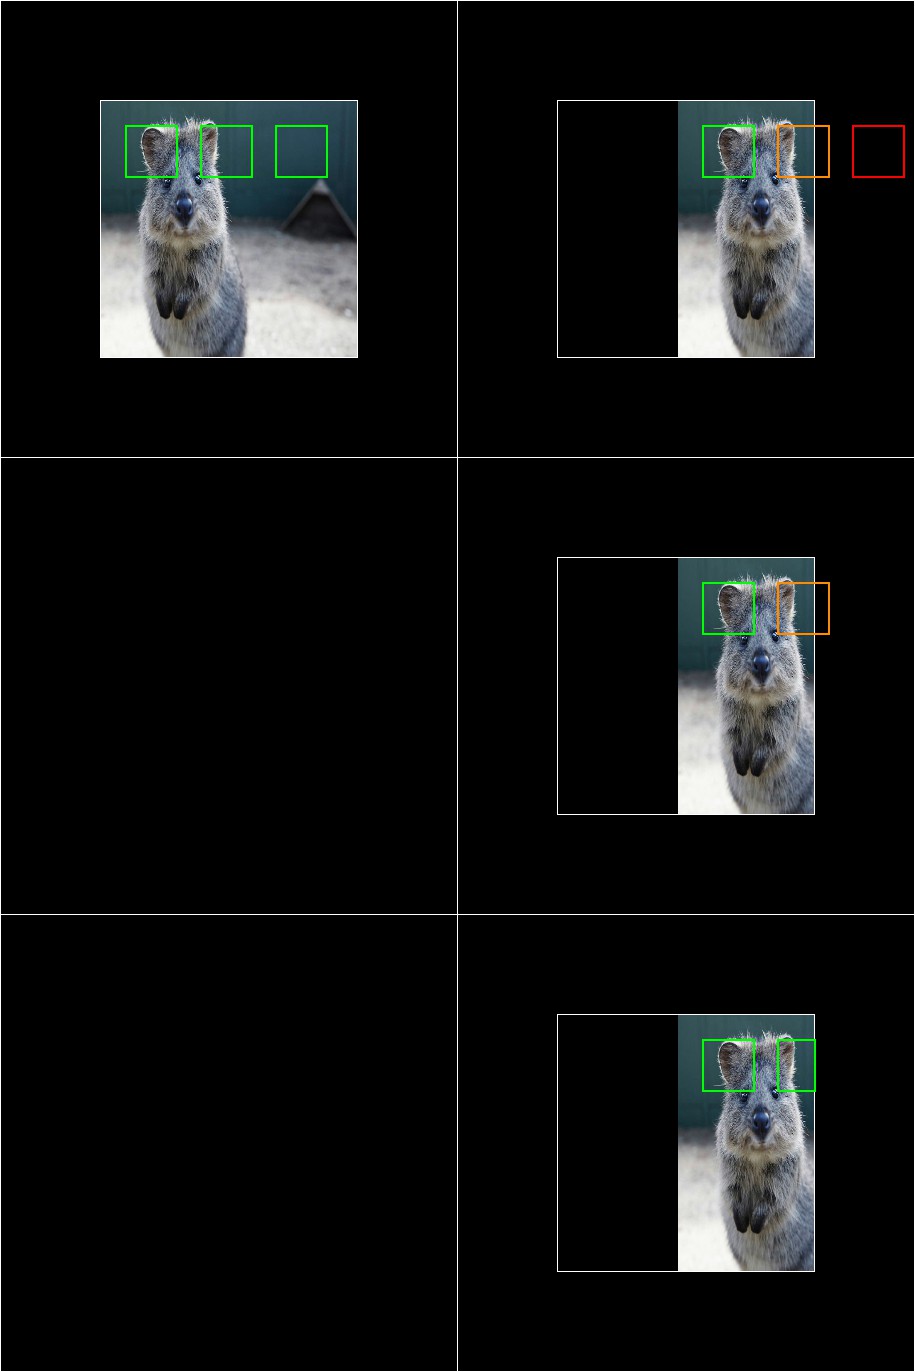
Results of the above example code. Top left: Original/unaugmented image with bounding boxes (here visualized with an additional black border around the image). Right, top: Image after augmentation (translation 120px to the right). One bounding box is now fully outside of the image area (red), one is partially outside of it (orange). Right, middle: After using .remove_out_of_image() the BB that was fully outside of the image area was removed. Right, center: After using .remove_out_of_image() and .clip_out_of_image(), one BB was removed and the one partially outside of of image area was clipped to be fully inside it.
Shifting/Moving Bounding Boxes
The function shift(top=<int>, right=<int>, bottom=<int>, left=<int>) can be used to change the x/y position of all or specific bounding boxes.
import imgaug as ia
from imgaug.augmentables.bbs import BoundingBox, BoundingBoxesOnImage


ia.seed(1)

# Define image and two bounding boxes
image = ia.quokka(size=(256, 256))
bbs = BoundingBoxesOnImage([
    BoundingBox(x1=25, x2=75, y1=25, y2=75),
    BoundingBox(x1=100, x2=150, y1=25, y2=75)
], shape=image.shape)

# Move both BBs 25px to the right and the second BB 25px down
bbs_shifted = bbs.shift(left=25)
bbs_shifted.bounding_boxes[1] = bbs_shifted.bounding_boxes[1].shift(top=25)

# Draw images before/after moving BBs
image = bbs.draw_on_image(image, color=[0, 255, 0], size=2, alpha=0.75)
image = bbs_shifted.draw_on_image(image, color=[0, 0, 255], size=2, alpha=0.75)
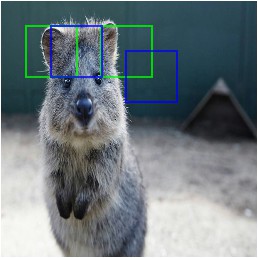
Using shift() to move bounding boxes around (green: original BBs, blue: shifted/moved BBs).
Projection of BBs Onto Rescaled Images
Bounding boxes can easily be projected onto rescaled versions of the same image using the function .on(image). This changes the coordinates of the bounding boxes. E.g. if the top left coordinate of the bounding box was before at x=10% and y=15%, it will still be at x/y 10%/15% on the new image, though the absolute pixel values will change depending on the height/width of the new image.
import imgaug as ia
from imgaug.augmentables.bbs import BoundingBox, BoundingBoxesOnImage


ia.seed(1)

# Define image with two bounding boxes
image = ia.quokka(size=(256, 256))
bbs = BoundingBoxesOnImage([
    BoundingBox(x1=25, x2=75, y1=25, y2=75),
    BoundingBox(x1=100, x2=150, y1=25, y2=75)
], shape=image.shape)

# Rescale image and bounding boxes
image_rescaled = ia.imresize_single_image(image, (512, 512))
bbs_rescaled = bbs.on(image_rescaled)

# Draw image before/after rescaling and with rescaled bounding boxes
image_bbs = bbs.draw_on_image(image, size=2)
image_rescaled_bbs = bbs_rescaled.draw_on_image(image_rescaled, size=2)
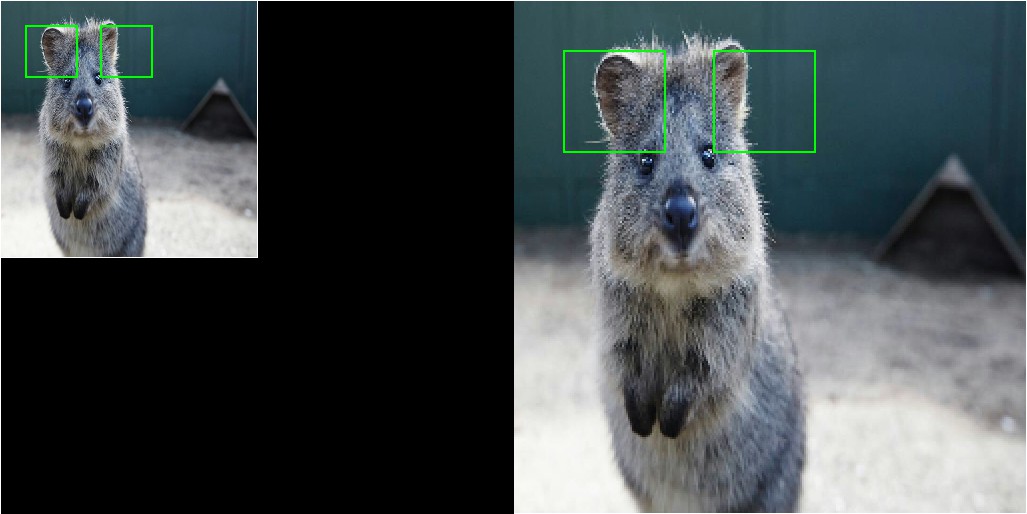
Using on() to project bounding boxes from one image to the other, here onto an image of 2x the original size. New coordinates are determined based on their relative positions on the old image.
Computing Intersections, Unions and IoUs
Computing intersections, unions and especially IoU values (intersection over union) is common for many machine learning experiments. The library offers easy functions for that.
import numpy as np
import imgaug as ia
from imgaug.augmentables.bbs import BoundingBox


ia.seed(1)

# Define image with two bounding boxes.
image = ia.quokka(size=(256, 256))
bb1 = BoundingBox(x1=50, x2=100, y1=25, y2=75)
bb2 = BoundingBox(x1=75, x2=125, y1=50, y2=100)

# Compute intersection, union and IoU value
# Intersection and union are both bounding boxes. They are here
# decreased/increased in size purely for better visualization.
bb_inters = bb1.intersection(bb2).extend(all_sides=-1)
bb_union = bb1.union(bb2).extend(all_sides=2)
iou = bb1.iou(bb2)

# Draw bounding boxes, intersection, union and IoU value on image.
image_bbs = np.copy(image)
image_bbs = bb1.draw_on_image(image_bbs, size=2, color=[0, 255, 0])
image_bbs = bb2.draw_on_image(image_bbs, size=2, color=[0, 255, 0])
image_bbs = bb_inters.draw_on_image(image_bbs, size=2, color=[255, 0, 0])
image_bbs = bb_union.draw_on_image(image_bbs, size=2, color=[0, 0, 255])
image_bbs = ia.draw_text(
    image_bbs, text="IoU=%.2f" % (iou,),
    x=bb_union.x2+10, y=bb_union.y1+bb_union.height//2,
    color=[255, 255, 255], size=13
)

Two bounding boxes on an image (green), their intersection (red, slightly shrunk), their union (blue, slightly extended) and their IoU value (white).